Part 1 - Using Map Layers
Recent OHRRPGCE releases introduce layered maps. You have up to 8 layers to work with, and the old Overhead wallmap bit isn't needed anymore (mixing it with layers would be confusing and unneeded, so you should avoid it). Tiles in the 2nd and higher layers can be transparent on a pixel-by-pixel basis.
Here is the order in which things on the map are drawn in-game:
Layer 0 (Bottom Layer)
Optionally, more map layers...
NPCs    *  Heroes are drawn before NPCs if 'NPCs over Heroes layering bitset is set
Heroes  *
Optionally, more map layers...
(For more details about draw order, see Layers.)
Overhead layers (those above NPCs/heroes) are commonly used for graphics like tree tops and branches. Beyond this, it can also be used to overaly embellishments, doors, walls, etc... over ground tiles. Take the following layers for example:
Layer 0 — Base Ground Layer
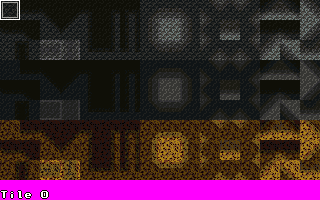
Layer 1 — Embellishments to the Ground Layer
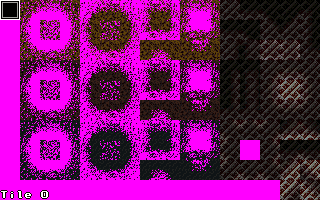
Layer 2 — Walls and Variants of Walls
Layer 3 — Water Tiles
Layer 4 — Map Embellishments Set 1
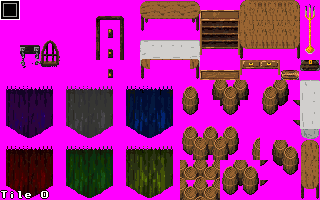
Layer 5 — Map Embellishments Set 2
Layer 6 — Overhead Tiles
Layer 7 — Wall Boundaries and Railings
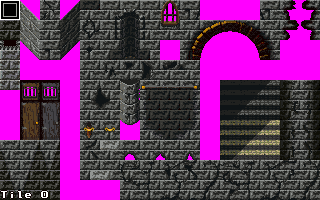
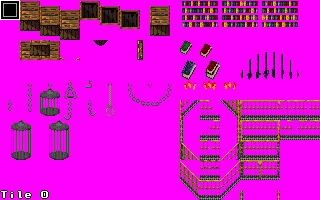
While using up all eight layers may be a bit excessive, it allows you to keep things organized and easy to handle. Further, it provides you with a greater range of options when designing tiles, as you have a greater number of tiles to work with. The above layers can thus all come together to make this:
Notice that you can have multiple layers below everything else: this is so that you can use layer 0 for the ground, and add as many layers as you need for anything you need to show either on the ground, or above the player. In the example above, the layer that heroes and NPCs are drawn on is right in between layers 5 and 6, this provides 6 layers of floors, walls, embellishments, and what-have-you to design the map with. now, there is no need to copy the same layer structure, as different games will obviously have different needs. One key element to remember though is that using layers well can minimize the work you need to exert on your tiles. Because you can overlay many different things on the same tile, you need not redraw the same rock or table for each floor tile in your tile map. This can greatly reduce the number of tiles needed for a single map as the need to duplicate embellishments for each type of ground tile is done away with. Take the following for example:
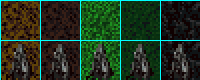
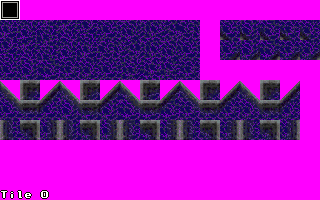
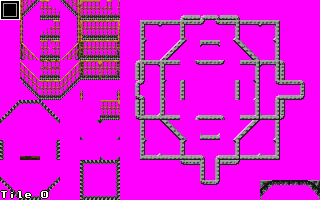
There are five different ground tiles, and five different rock tiles. This can be rather inefficient, as having a large number of ground tiles and a large number of embellishments will very quickly deplete the space one has for other tiles. Consider the following:
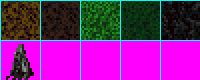
There are only six tiles, but it's possible to achieve just as many combinations of ground and rock as the previous image. When editing your actual maps though, the tile of the rock would be on a layer above the ground tiles, in order to make it transparent.
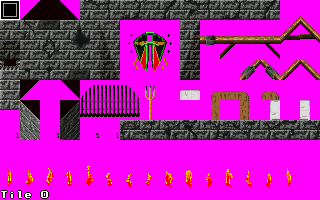
Now lets suppose we want a large tree on our map, which the player can walk behind and in front of.
Drawing Transparent Tiles[edit]
Colour 0 is the transparent colour for tiles on transparent layers (layer 1 and up). If you are using the default OHR palette, it will appear as black in the Maptiles Editor. Use a different black (there are several in the default Master Palette) if you want black on a tile intended for the transparent layers.
For our map, we might draw a simple grass tile, and the tree trunk and top on multiple tiles, surrounded by colour 0.
Editing Layers[edit]
Before editing layers, you must add and/or enable them. Press CTRL+L while in the Tilemap Editor to select layers to edit. In this menu, press F1 for more help.
A disabled layer can't be editted, and isn't drawn while editting the map, BUT it does appear ingame. An Invisible layer is NOT drawn ingame (or while editing). The visibility of a layer can be toggled with a script command.
To select a layer, press Page Up and Page Down. At the bottom of the screen is the current layer number.
Place tiles on layers as normal. If you can't see what you're doing, make other layers invisible, or make the current layer jiggle about with CTRL+J
Getting back to our tree, suppose that we have a footoffset on this map, to draw NPCs and heroes not strictly aligned with the tile grid, but seeming to stand in the middle of a tile. So we want the player sprite on top of the tree trunk when standing in front of it. So we create two new layers, one below NPCs/heroes (layer 1), and one above (layer 2). Place the tree trunk tile on layer 1, and the rest of the tree on layer 2.
Layers and the Wallmap[edit]
Maps still have only a single layer wallmap. The default passibility settings of tiles in all layers at a spot is combined to set the wallmap.
Introduction | Getting Started | Artwork | Map Construction | NPCs | Tags | Making a Hero | Attacks | Items | Battles | Vehicle Use | Sound and Music | Text Boxes | Custom Menus | Slices | Plotscripting | Distributing a Game
Appendices: Keyboard Conventions | Sample Scripts

