Chapter 2 - Getting Started
Welcome to the second chapter, where we'll cover everything you need to get started! This chapter is perhaps one of the shorter ones, as we'll be covering the very basics of getting started. Before we get to it, a little note first. Each chapter or segment will have a little blue box like the one below detailing what the section aims to accomplish or teach. That way, you'll have a good idea where you are in the tutorial, and what you're going to be getting done.
By the End of This Section you Should...
- have downloaded and installed the engine
- created your first RPG file
- added some basic details to your game
Ready? Let's get down to it then.
Contents
Downloading and Installing[edit]
The first step is to download the proper files from here. The OHRRPGCE is cross-platform compatible, meaning that you can install and run it on most of the major operating systems, Linux, Windows, and Mac.
|
The Windows installation is fairly straightforward. Download and run the executable at http://hamsterrepublic.com/dl/ohrrpgce-win-installer.exe. For a step-by-step breakdown of the process, go here |
|
|
There are a few more choices for Linux than there are for Windows, and it may seem daunting at first but it's just as straightforward. For Debian or Ubuntu, you can simply download the appropriate .deb file (http://hamsterrepublic.com/ohrrpgce/archive/debian/). Alternatively, you can download a tarball containing the required binaries (http://hamsterrepublic.com/dl/ohrrpgce-linux-x86.tar.bz2). |
|
|
Download the dmg archive from http://hamsterrepublic.com/dl/OHRRPGCE.dmg then mount it. Drag and drop OHRRPGCE-Game.app and OHRRPGCE-Custom.app into your applications folder. The first time you run each of them you will need to confirm that you want to open a program downloaded from the internet. |
Making Your First Game[edit]
Now, there is far too much information as to how to make your own game to be included in a single chapter. But what we -will- go through here are the basic steps needed to get an .rpg file up and running.
Creating the RPG[edit]
First of all, fire up CUSTOM (the main editor) in whatever manner you wish to depending on your operating system. You'll be confronted with a screen that looks like this:

The three main options are fairly self-explanatory:
- Create New Game
- Load Existing Game
- Exit Program
For now, select Create New Game and you'll be shown a screen where you can type the filename of your RPG. We'll start with something like "myfirstgame" as shown below.
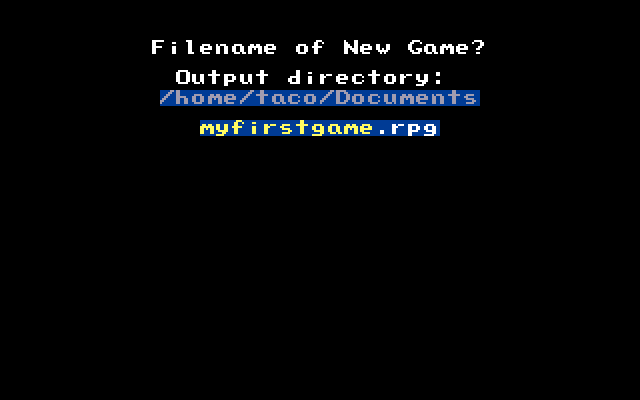
If you've done everything correctly (and at this point it's fairly difficult to make any mistakes unless you're deliberately trying to) you should be presented with a screen like the one below.

Congratulations! You've completed the first step towards making your very own RPG! Before we go any further though, let's make sure that everything is nice and organized. This step is optional, and how you go about it will vary from developer to developer, but the important thing to keep in mind is that you should make sure that all of your files are well-organized and that all your files are easy to find.
Organizing Your Files[edit]
When making an RPG, you're definitely going to be dealing with a whole bunch of different files. Now, while it's definitely possible to just lump all of your files into a single directory, it might not be a good idea as you'll eventually be sifting through dozens of files just to find the correct one. The first step is to move your .rpg file into its own directory. Where the .rpg file is located will vary depending on your operating system.
|
insert where the file is located |
|
|
By default, your .rpg file will be in the directory where CUSTOM is located. As the directory where Custom is located is the first place it looks when loading files, it's a good idea to create a subdirectory for your game here. |
|
|
insert where the file is located |
Now, while it's not written in stone, a generally good way to organize your files is as follows:
- Art
- Documentation
- Music
- Resources
- Scripts
- Sound
You can play around with different structures, but we'll be building off this layout in all of our examples. At the end of each chapter, a download will be provided with this directory so you can follow along with the progress being made. For now, we'll stick to this layout to avoid any confusion later on down the road.
[edit]
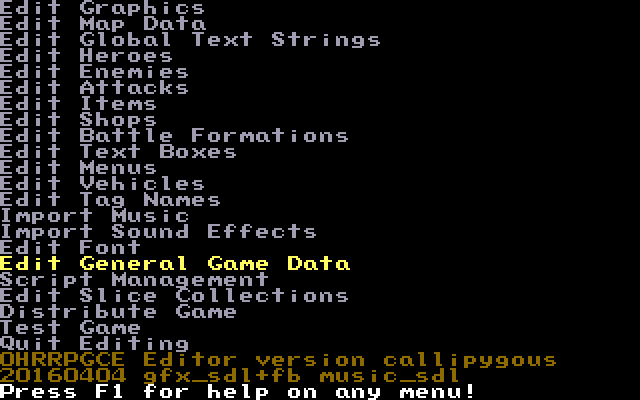
Now that you've created your .rpg file, you'll be shown a rather daunting looking screen like the one below:
For now, ignore everything and navigate to "Edit General Game Data" using your keyboard. It's near the bottom of the list, just between "Edit Font" and "Script Management", both of which are things we needn't concern ourselves with right now. For now, we're going to name our game.
Take note that pretty much everything in Custom is controlled by the keyboard, so it may take some getting used to for those more familiar with using the mouse.
Pro Tip |
 |
|
You can type the first few letters of the menu you want to get to in order to avoid having to press up and down multiple times. This acts like a search function of sorts, and can allow you to quickly navigate menus, tilemaps, and scripts especially later on when you've got tons of stuff imported. |
|
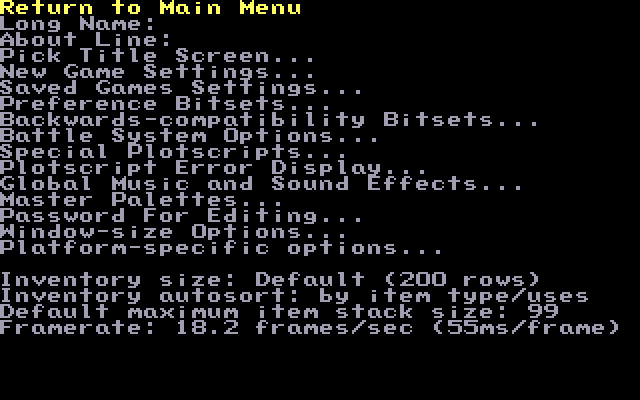
Now, you should be at the screen where you can edit all of the different details about your game to your heart's desire. Let's get down to it in the next section then.
Adding Project Details[edit]
Now that you're at the "Edit General Game Data" menu screen, you'll be able to edit the basic properties of your game.
The items are as follows:
- Long Name – This is the long name for your game. So rather than DQVI, you could type in Dragon Quest VI.
- About Line – This is a rather short blurb about your game.
- Pick Title Screen – As the name states, this allows you to pick your title screen.
- New Game Settings – This allows you to set things like starting money, position, and map.
- Saved Game Settings – This allows you to choose the number of save slots and what they save.
- Preference Bitsets – These will allow you to set global bitsets for your game.
- Backwards-compatibility Bitsets – This holds bitsets for compatibility with old games. You probably won't need to mess with these.
- Battle System Options – Pretty self-explanatory, this allows you to change details of the battle system.
- Special Plotscripts – These are special plotscripts that run when a game is started, loaded, or if the hero dies.
- Plotscript Error Display – This allows you to set how plotscripting errors are displayed.
- Global Music and Sound Effects – This sets music and sound effects for things like the title screen or changing menu items in-game.
- Master Palettes – The master palette of your game which contains all the colors you can use.
- Password for Editing – Allows you to set a password for your game.
- Window-size Options – Allows you to change the game's resolution and whether or not it starts in fullscreen.
- Platform-specific options – Special options for working with Android and OUYA, and settings for in-app purchases.
- Inventory size – Sets the amount of slots in the player's inventory.
- Inventory autosort – Controls the function of the "sort" button in the inventory.
- Default maximum item stack size – As the name suggests, sets the default stack size for items.
- Framerate – Sets the game's framerate. Warning! Changing this from the default 18.2 fps will affect waits, animation speeds, and pretty much everything else! Be prepared to do a lot of plotscripting if you want silky-smooth fps.
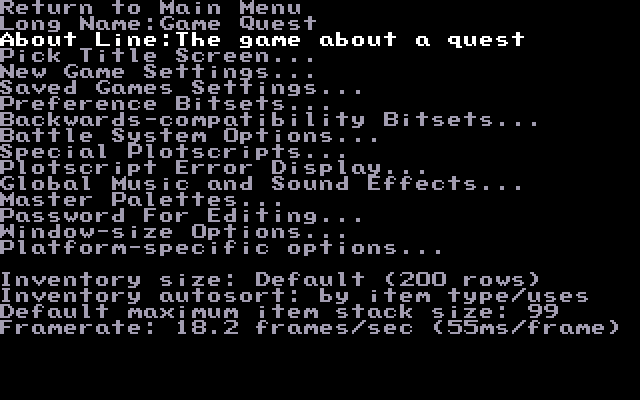
Holy moly, talk about information overload! Don't panic though, for now we'll only concern ourselves with the first two of these items, and slowly build up to the rest of them as we progress through the tutorial. For now, we'll just give our game a name and a short About Line. We'll call this tutorial game "Game Quest". Go to Long Name and type "Game Quest" in. You don't need to press save or anything else, as soon as you've typed the name in, it's there. Next, go to About Line and enter a short description of the game. In this case, we'll add "The game about a quest" to keep things nice and simple. If all went well, your screen should look like this now:
That's all for the getting started chapter. Next, we'll move on to more exciting and fun things like getting some graphics into our game to play with. You can download the sample files in the link below so that you can keep pace with the tutorial. Each chapter will have similar downloads, so you can follow along with all the changes we make.
Introduction | Getting Started | Artwork | Map Construction | NPCs | Tags | Making a Hero | Attacks | Items | Battles | Vehicle Use | Sound and Music | Text Boxes | Custom Menus | Slices | Plotscripting | Distributing a Game
Appendices: Keyboard Conventions | Sample Scripts

