Moving on to Map Construction
Pick Edit Maps from the main menu. A new game always starts with a blank Map 0. As you go along, you can make more maps. There is a limit of 32767 maps.
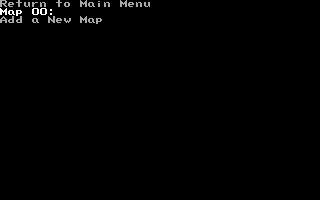
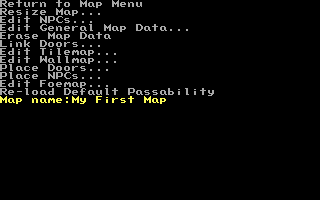
Pick Map 0, and you will go to the map sub-menu. Choose Map Name: and type in a name for your map. This name will show up on the Map Editor screen, so that you don't have to remember map numbers, and can optionally be displayed when the player enters the map (See the Edit General Map Data menu)
Only the resizing screenshots need to be updated. The rest are okay.
The reason this article has been marked is: map resizer has been rewritten.
Now lets pick Resize map... and choose a new size for the map. You will see a small preview of your map (now empty) where each pixel represents one tile. A screen is 16 tiles wide by 10 tiles, so size your map accordingly.
The arrow keys resize the map, and CTRL+arrow keys offset it (used when resizing an existing map). Hold ALT to move fast. Press ESC to cancel, or ENTER to confirm and resize. I recommend starting off with a medium sized map. Try 110 wide and 45 high. You can change the size later.
Your map can be no smaller than 16x10 and its total area can be no greater than 100,000 square tiles.
Next choose Edit TileMap. The last five options are the six editing modes, Tilemap, Wallmap, Doors, NPCs, Foemap and Zones. You can change between them while editing by pressing F2 through F7, but for now, just worry about Tilemap. You should see the tiles you drew earlier along the top of the screen:
While Editing the TileMap:
- Arrow keys move the cursor
- SPACE places a tile
- Period and comma change which tile you will place
- ENTER lets you pick your tile full screen. ENTER again returns to the map.
- Hold ALT and press arrow keys to scroll the whole screen around.
- Press TAB to turn on and off a box that will show you what portion of the map you are looking at.
- Press G to set the selected tile to be the same as the tile under the cursor
- Press CTRL+Z to undo changes
- Press CTRL+Y to redo undone changes
- Hold CTRL and press F to fill the screen with the current tile.
- Hold CTRL and press R to replace all tiles like the one under the cursor
- Press ~ to see a tiny version of your map
- Press CTRL+H to set the hero's starting location
- ESC leaves, returning to the menu
- Press F1 to see the help screen for the tilemap editor
- Press F2 to F7 change editing mode:
- F2: Tilemaps (Picture Mode)
- F3: The Wallmap (Passability Mode)
- F4: Door placement mode
- F5: NPC placement mode
- F6: Foe mapping mode
- F7: Zone mapping mode
- Press 1 or 2 to make a tile animate (animating tiles are explained later)
- Press CTRL+1 or CTRL+2 to make all instances of the selected tile animate
- Press CTRL+D to turn on or off default tile passability
- Press CTRL+L to enable or disable layers
- PgUp and PgDown change which layer you are working on
- Press CTRL+J to jiggle the current layer; this is useful for spotting mis-layered tiles
- Press CTRL+P to fill all tiles of the type under your cursor with the selected tile. This works like the "paint bucket" tool in many graphics programs--so if you have the walls of a room drawn, you can use it to fill the empty space within the walls with a floor tile without erasing the walls (unlike CTRL+F, which fills the entire screen.)
Select your water tile, and use the arrow keys and the space bar to draw some water on to your map.
You may want to go back to the maptile editor, and draw some more tiles for your map; shoreline, trees, rocks, etc. Then you can come back to the map editor, and pretty-up your map a bit.

After you have made your map, press F2 to switch to Passability mode. This is the same as pressing ESC and picking Edit WallMap from the menu
Now you get to define where heroes and NPCs can walk.
The controls in Passability mode are as follows:
- Arrow keys move the cursor
- SPACE makes a tile impassable. SPACE again makes it passable
- Hold ALT and press arrow keys to scroll the whole screen around.
- Hold CTRL and press arrow keys to selectively change the passability of a tile. Try it, and you will see what I mean.
- CTRL Up makes the tile impassable on the top.
- CTRL Down makes the tile impassable on the bottom.
- CTRL Left makes the tile impassable on the left side.
- CTRL Right makes the tile impassable on the right side.
- Press O to make a tile overhead. Overhead tiles will be drawn over sprites (and tiles on higher layers!) instead of under them. This feature is obsolete by map layers. Mixing it with layers is confusing, so is not recommended.
- Press H to mark a tile as a harm-tile. Harm-tiles can be made to inflict damage on your hero when you step on them
- Press TAB to turn on and off a box that will show you what portion of the map you are looking at.
- Press F# keys to change editing modes (same as above)
- ESC returns to the menu
As you press SPACE or CTRL+Arrow-Keys, you will place walls on the map. they will show up as flashing grey lines Nobody, hero nor NPC can walk across the flashing grey lines (well, vehicles can sometimes, but we will get into that later).
Now press F4 to go to door mode.
By this time, you should have the hang of the controls, so I wont go into detail.
- SPACE places a door, and if there is already a door under the cursor, SPACE will remove it.
- Arrow keys and such work the same as in tilemap more and passability mode
Just for the sake of practice, create two doors on your map. Door 0 and door 1. The press ESC, and pick "Link Doors" from the map menu. A door is only a logical marker, you will still need to draw a tile that will provide the visual picture of the door.
Each of the statements links an entry to an exit. by default, all links are: Door 0 always leads to Door 0 on map 0. Pick the first statement, and press SPACE or ENTER

The first number identifies the entry door. The second number identifies the exit door, and the third number identifies what map the exit door is on. The fourth and fifth numbers are for conditional tags.
Change the numbers to:
Entrance Door 0
Exit Door 1
Exit Map 0
Require Tag 0 [N/A]
Require Tag 0 [N/A]
now press ESC, and pick the next statement down the list.
Change the numbers to:
Entrance Door 1
Exit Door 0
Exit Map 0
Require Tag 0 [N/A]
Require Tag 0 [N/A]
Now Door 0 and Door 1 on your map are linked!
Keyboard Shortcuts | Getting Started | Making Maptiles | Making Walkabout Graphics | Importing BMP graphics | Moving on to Map Construction (Using Map Layers) | Making a Hero | Battles | How to use NPCs and Tags | Adding, Removing, Swapping, Heroes | Animating Maptiles | Vehicle Use | Stun, Regen, Poison, and Mute | Sound Effects | Everything You Ever Wanted to Know About Text Boxes, But Were Afraid To Ask (Portrait Boxes) | Distributing a Game
Bosses | Making Complex Attacks | Combat Dialogues | Enemies that respond to a certain attack | Ways to refer to a hero in a script | Creating Dungeons | Permanent Stat-Boosters | Conditional Door Links | Creating Cutscenes | Using the Mouse in the Game | Making Android games
See Also[edit]
- How do I make buildings? for more map construction
- Using Map Layers
- Zones